
9
comments
How to Add Vertical HTML+CSS Menu Widget in Blogger
After giving tutorial on "How to Add Menu Widget in Blogger - Horizontal menus", today we will see how you can add Vertical CSS Menus in your Blogger or Blogspot Blogs. we have a different 17 types of vertical CSS Menus which you can integrate in your blog.

This tutorial is also very easy to understand and after reading this post you will be able to integrate Vertical CSS Menus in your Blog. All Menus given here are customizable and free to use and Download. Vertical CSS menus work perfectly as a sidebar navigation solution for your blog.
Vertical Menus are specially for the bloggers who have the kind of Blog design where they can easily set the Vertical menus in their Sidebar as a Widget and hence can improve the look and feel of the blog as well. Here is a list of 17 Vertical menus and i will give you the demo and download link for all of them. Now what you need to do is just picked up the one you liked most and download it first. Below is a Complete list of Vertical menus.
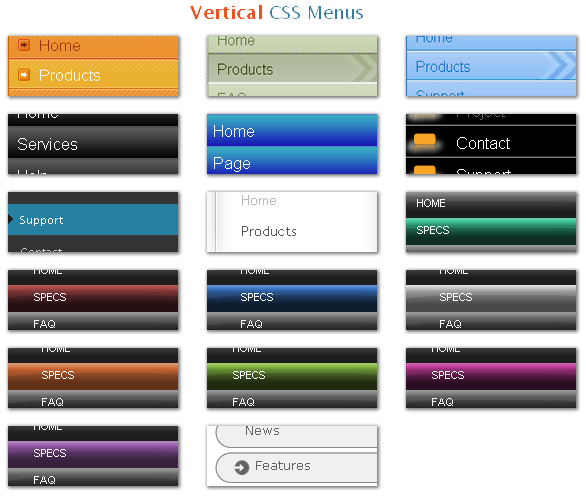 Below Menus are from the Above image and menu numbers are 1 to 17 respectively.
1. Orange Pumpkin: Demo | Download Source
2. Olive Arrow: Demo | Download Source
3. Sky Arrow: Demo | Download Source
4. Dark Bubble: Demo | Download Source
5. Aqua Bubble: Demo | Download Source
6. Bittbox Black: Demo | Download Source
7. Massive Blue: Demo | Download Source
8. White Ghost: Demo | Download Source
9. Grey Hat: Demo | Download Source
10. Aqua Bubble Wrap: Demo | Download Source
11. Red Bubble Wrap: Demo | Download Source
12. Blue Bubble Wrap: Demo | Download Source
13. Grey Bubble Wrap: Demo | Download Source
14. Orange Bubble Wrap: Demo | Download Source
15. Lime Bubble Wrap: Demo | Download Source
16. Pink Bubble Wrap: Demo | Download Source
17. Purple Bubble Wrap: Demo | Download Source
- Select Any one menu from the above given list and download the .zip file which should contain HTML file, Images and CSS files for the menu.
- To Proceed further in the demo i have choosen 1. Orange Pumpkin menu and will guide you how to set the menu in your blog.
3 Mandatory things you must have before going ahead.
- HTML File - Contains the code of the menu
- Images folder - Contains Images used in menu
- CSS file - Contains Style used in menu
Note: Before making any changes to your template, take a full backup of your blogger template.#Step 1. Log in to your Blogger Dashboard and Navigate to Design > Page Element.

#Step 2. Click on Add a Gadget > HTML/JavaScript link and insert the following type of code (You will get it from Downloaded HTML file) and click Save button.
<div class="menu bubplastic vertical purple">

<ul>

<li><span class="menu_r"><a href="http://bloggerhowtotips.blogspot.com/"><span class="menu_ar">Blogger Tips</span></a></span></li>

<li class="highlight"><span class="menu_r"><a href="http://bloggerhowtotips.blogspot.com/"><span class="menu_ar">Blogger Widgets</span></a></span></li>

<li><span class="menu_r"><a href="http://bloggerhowtotips.blogspot.com/"><span class="menu_ar">Blogger How TO</span></a></span></li>

<li><span class="menu_r"><a href="http://bloggerhowtotips.blogspot.com/"><span class="menu_ar">Blogspot How TO</span></a></span></li>

</ul>

<br class="clearit" />

</div>
#Step 3. Now Drag & Drop that Widget to the left side of the Blog Posts Section.
How to Add CSS for Menu:
#Step 4. Now Navigate to Design > Edit HTML Section.

- Find this type of code ]]></b:skin> and replace it with this type of CSS Code (You will get the .css file in your downloaded folder) :
.clearit {

margin: 0;

padding: 0;

height: 0;

clear: both;

}

/* BUBBLE PLASTIC HORIZONTAL MENU */

.bubplastic.horizontal {

width: 100%;

height: 27px;

margin: 0;

padding: 0;

background: #000000 url(images/bg-bubplastic.gif) top left repeat-x;

}

.bubplastic.horizontal ul {

list-style: none;

margin: 0;

padding: 0;

}

.bubplastic.horizontal ul li {

float: left;

margin: 0;

padding: 0;

background: transparent url(images/bg-bubplastic-button.gif) top left no-repeat;

}

.bubplastic.horizontal ul li a {

display: block;

height: 27px;

padding-left: 35px;

float: left;

text-transform: uppercase;

font-family: "Helvetica Neue",helvetica,"microsoft sans serif",arial,sans-serif;

font-size: 70%;

color: #FFFFFF;

text-decoration: none;

}

.bubplastic.horizontal ul li a span.menu_ar {

display: block;

float: left;

height: 22px;

padding-top: 5px;

padding-right: 35px;

background: transparent url(images/bg-bubplastic-button.gif) top right no-repeat;

cursor: pointer;

}

/* END BUBBLE PLASTIC HORIZONTAL MENU */

/* BUBBLE PLASTIC VERTICAL MENU */

.bubplastic.vertical {

width: 125px;

margin: 0px;

padding: 0px;

display: block;

}

.bubplastic.vertical ul {

display: block;

list-style: none;

margin: 0;

padding: 0;

}

.bubplastic.vertical ul li {

display: block;

float: left;

width: 100%;

margin: 0;

padding: 0;

background: transparent url(images/bg-bubplastic-button.gif) top left no-repeat;

}

.bubplastic.vertical ul li a {

display: block;

margin: 0;

width: 100%;

padding-left: 35px;

text-transform: uppercase;

font-family: "Helvetica Neue",helvetica,"microsoft sans serif",arial,sans-serif;

font-size: 70%;

color: #FFFFFF;

text-decoration: none;

background: transparent url(images/bg-bubplastic-button.gif) top left no-repeat;

}

.bubplastic.vertical ul li a span.menu_ar {

display: block;

margin: 0;

width: 100%;

height: 22px;

padding-top: 5px;

padding-right: 35px;

background: transparent url(images/bg-bubplastic-button.gif) top right no-repeat;

cursor: pointer;

}

/* END BUBBLE PLASTIC VERTICAL MENU */

/* AQUA HOVER */

.bubplastic.aqua ul li a:hover,

.bubplastic.aqua ul li.highlight a {

background: transparent url(images/bg-bubplastic-h-aqua.gif) top left no-repeat;

}

.bubplastic.aqua ul li a:hover span.menu_ar,

.bubplastic.aqua ul li.highlight a span.menu_ar {

background: transparent url(images/bg-bubplastic-h-aqua.gif) top right no-repeat;

}

/* BLUE HOVER */

.bubplastic.blue ul li a:hover,

.bubplastic.blue ul li.highlight a {

background: transparent url(images/bg-bubplastic-h-blue.gif) top left no-repeat;

}

.bubplastic.blue ul li a:hover span.menu_ar,

.bubplastic.blue ul li.highlight a span.menu_ar {

background: transparent url(images/bg-bubplastic-h-blue.gif) top right no-repeat;

}

/* GRAY HOVER */

.bubplastic.gray ul li a:hover,

.bubplastic.gray ul li.highlight a {

background: transparent url(images/bg-bubplastic-h-gray.gif) top left no-repeat;

}

.bubplastic.gray ul li a:hover span.menu_ar,

.bubplastic.gray ul li.highlight a span.menu_ar {

background: transparent url(images/bg-bubplastic-h-gray.gif) top right no-repeat;

}

/* LIME HOVER */

.bubplastic.lime ul li a:hover,

.bubplastic.lime ul li.highlight a {

background: transparent url(images/bg-bubplastic-h-lime.gif) top left no-repeat;

}

.bubplastic.lime ul li a:hover span.menu_ar,

.bubplastic.lime ul li.highlight a span.menu_ar {

background: transparent url(images/bg-bubplastic-h-lime.gif) top right no-repeat;

}

/* ORANGE HOVER */

.bubplastic.orange ul li a:hover,

.bubplastic.orange ul li.highlight a {

background: transparent url(images/bg-bubplastic-h-orange.gif) top left no-repeat;

}

.bubplastic.orange ul li a:hover span.menu_ar,

.bubplastic.orange ul li.highlight a span.menu_ar {

background: transparent url(images/bg-bubplastic-h-orange.gif) top right no-repeat;

}

/* PINK HOVER */

.bubplastic.pink ul li a:hover,

.bubplastic.pink ul li.highlight a {

background: transparent url(images/bg-bubplastic-h-pink.gif) top left no-repeat;

}

.bubplastic.pink ul li a:hover span.menu_ar,

.bubplastic.pink ul li.highlight a span.menu_ar {

background: transparent url(images/bg-bubplastic-h-pink.gif) top right no-repeat;

}

/* PURPLE HOVER */

.bubplastic.purple ul li a:hover,

.bubplastic.purple ul li.highlight a {

background: transparent url(images/bg-bubplastic-h-purple.gif) top left no-repeat;

}

.bubplastic.purple ul li a:hover span.menu_ar,

.bubplastic.purple ul li.highlight a span.menu_ar {

background: transparent url(images/bg-bubplastic-h-purple.gif) top right no-repeat;

}

/* RED HOVER */

.bubplastic.red ul li a:hover,

.bubplastic.red ul li.highlight a {

background: transparent url(images/bg-bubplastic-h-red.gif) top left no-repeat;

}

.bubplastic.red ul li a:hover span.menu_ar,

.bubplastic.red ul li.highlight a span.menu_ar {

background: transparent url(images/bg-bubplastic-h-red.gif) top right no-repeat;

}

]]></b:skin>
- From above CSS code you can remove the styles which you are not going to use in your blog.
How to Add Images of Menu in Blogger:
- Before Saving the above CSS code you have to change image path URL given in red text above. you need to just need to upload it to the Picasa or in blogger and copy the generated HTML image Code and paste that code in Menu Code or CSS Code wherever applicable. (Upload images which you will get from \images folder) You can use either blogger, picasa, photobucket or any other image hosting services to host your menu images.
#Step 5. Save template and done!.
Note: If you want me to add any CSS menu to your blog or want Tutorial for adding any menu please comment Below the URL of that menu and your Blog Name + Link. I will Surely try to help you.
If you need any help please Leave a response.


Thank you for this useful post.
I don't know why I managed to create the Menu on my first attempt on this blog: http://thuydinh-page.blogspot.com/ (See Left Column)
But when I try doing the same thing on this blog, it turned out like this (Scroll down and look at Left Column). The design did not appear right!
FYI, I used CSS Menu Generator Software to create the Vertical Dropdown menu and copy the HTML Code and CSS Code from there.
Pls help, I'd appreciate it very very much. You can drop me an email at Thuydh@hotmail.com
Thanks for your reply. The http://www.hashoofoundationusablog.com/ is the blog that the Menu didn't work. Scroll down, see the CSS Dropdown menu on the Left Bar? That's where the problem is!
Hope you can help me. I'm quite a beginner in Blog Design so I'd really appreciate your support.
Thanks,
I have granted you admin's rights to my blog. Can you help me with the Menu coding, I still can't find out the problem!