3
comments
Customize Next-Home-Previous Post Links in Blogger Footer Using Images
Blogger is providing link to home page, previous page and next page from any given specific post page. There are number of bloggers who want to use custom images these home, previous and next post instead of using links.Many bloggers needs a hack on how to remove or change “Newer Post and “Older post” Link from blogspot post footer. Some want to add images instead of “new post” and “old post” Link.
In this post i will guide you on How to Use Custom Images for Home, Previous and Next Post Links while using blogger and customize your template and design.
Steps to Add Custom Images for Home, Previous and Next Post Links in Blogger
Note: Before making any changes to your template, take a full backup of your blogger template.
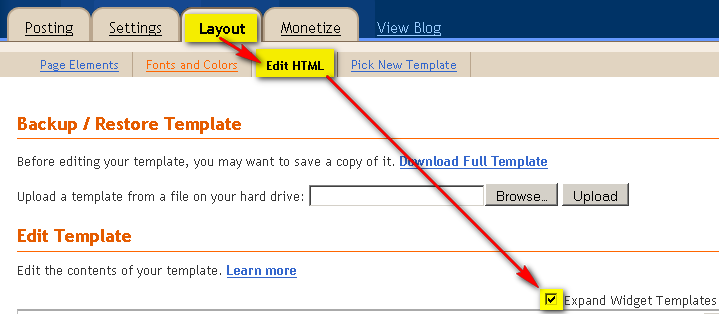
#Step 1. Log in to your Blogger Dashboard and Navigate to Layout > Edit HTML and checked the Expand Widget Templates Check box.

#Step 2. Find below highlighted code in your template:
<div class='blog-pager' id='blog-pager'>
<b:if cond='data:newerPageUrl'>
<span id='blog-pager-newer-link'>
<a class='blog-pager-newer-link' expr:href='data:newerPageUrl' expr:id='data:widget.instanceId + "_blog-pager-newer-link"' expr:title='data:newerPageTitle'><data:newerPageTitle/></a>
</span>
</b:if>
<b:if cond='data:olderPageUrl'>
<span id='blog-pager-older-link'>
<a class='blog-pager-older-link' expr:href='data:olderPageUrl' expr:id='data:widget.instanceId + "_blog-pager-older-link"' expr:title='data:olderPageTitle'><data:olderPageTitle/></a>
</span>
</b:if>
<b:if cond='data:blog.homepageUrl != data:blog.url'>
<a class='home-link' expr:href='data:blog.homepageUrl'><data:homeMsg/></a>
<b:else/>
<b:if cond='data:newerPageUrl'>
<a class='home-link' expr:href='data:blog.homepageUrl'><data:homeMsg/></a>
</b:if>
</b:if>
</div>After finding above code replace it with this code:
- Replace <data:newerPageTitle/> for Next Post with <img src='YOUR-IMAGE-LINK alt='Next Post' />
- Replace <data:olderPageTitle/> for Older Post with <img src='YOUR-IMAGE-LINK alt='Previous Post'/>
- Replace <data:homeMsg/> for Homepage with <img src='YOUR-IMAGE-LINK' alt='Home' />
#Step 3.Click On Preview to preview changes or click on Save to save yours Work, if everything works fine then Save template and done!.
Note: For demo purpose you can use below given images, just right click on it and copy image address and paste it at YOUR-IMAGE-LINK.
Hope this post will be helpful for all blogger newbies. If you need any other customization then feel free to ask in comment form below.


Thnx for posting the article
Funniest Meme Pinoy Version