0
comments
How to Add Signature Image at The End of Each Posts in Blogger
This post is for blogspot users who want to attach a signature in their Blogger Blogs. After Receiving an e-mail from one of my blog reader i have posted this article which will guide you through and let you know that How you can add Signature in Blogger like the image given here.

Before Adding the signature you must have an image of your signature of any size, but i suggest you to use small signature image. you can use Microsoft Excel or Word to Create a signature image and save it as .jpg or .png, after having an image you need to upload it to your server.
I will suggest you to upload it into one of your blog post and once you have uploaded the image you can go into your post's EDIT HTML section and copy the<img src='url_of_your_signature_image' style='border:0px;'/> Code. Once you have copied that code you can delete that code but copy the code in some notepad for further use.
Steps to Add Signature Image in Blogger
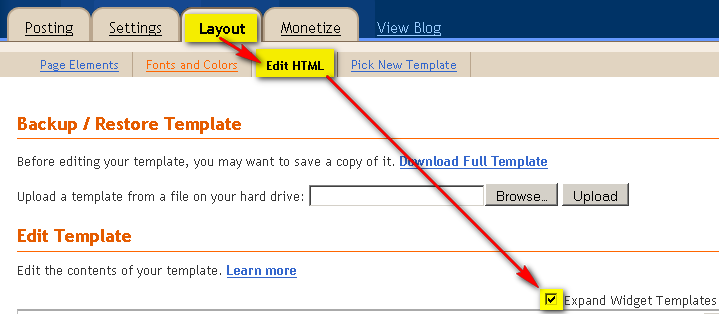
Note: Before making any changes to your template, take a full backup of your blogger template.#Step 1. Log in to your Blogger Dashboard and Navigate to Layout > Edit HTML and checked the Expand Widget Templates Check box.

#Step 2. Find any of this code:
<div class='post-footer-line post-footer-line-1'>

OR

<p class='post-footer-line post-footer-line-1'>

OR

<data:post.body/>
Put image code you have copied already after above code and save you template.
after adding code you code should look something like this:
<div class='post-footer-line post-footer-line-1'>

<img src='url_of_your_signature_image' style='border:0px;'/>
That's it, now you will find that at the end of each blog post your signature image is displaying very well.
if you have any difficulty while implementing this hack, comment below your problem.


0 Responses to "How to Add Signature Image at The End of Each Posts in Blogger" - Leave a response
Hi,
Your feedback is always appreciated. If you're having issues, PLEASE leave an email address I can contact you on - and also don't forget to leave your blog URL.
Note:
1. Please do not spam.
2. For Asking Off-Topic Questions please comment on this page -> Blogger Help
Regards,
Best How to Blogger.
Post a Comment